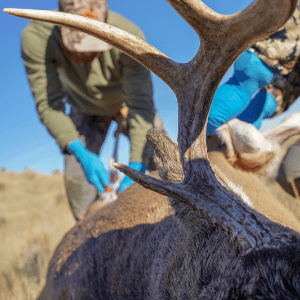
Learning how to field dress a deer is an important step since you want to make sure you take care of cleaning and quickly hauling your deer out of the woods. There is no sense in carrying a bunch of extra weight, which can be left in the woods to feed other animals out there.
A whitetail deer can yield 30 to 50 pounds of meat, or maybe even more if you get that trophy buck. In this guide, we’ll walk through how to field dress a deer in 10 minutes so you can get it out of the backcountry and home, or to the butcher, to turn it into lean packaged meat.
Contents
Field Dressing Deer
Many hunters take a deer to a butcher for processing, but you will still need to field dress your deer first.
Field dressing a deer consists of removing the deer’s internal organs. This is essential for three reasons:
- When a deer dies, bacteria will start growing almost immediately, which will cause the meat to spoil.
- Opening up the deer and removing the warm organs helps to cool the carcass faster to reduce bacteria growth.
- A dressed deer is lighter and easier to haul out of the field and load into your truck.
The idea of pulling guts out of a dead body might be off-putting for some, but it is a necessary part of hunting deer and does not have to be complicated. In fact, field dressing a deer can be quick and easy.
Let’s dive into my quick and easy step-by-step guide to field dress a deer.
Tip: Wait 30 Minutes to Approach Your Deer
Before you dress a deer, make sure it’s dead. This means waiting for a solid 30 minutes before approaching the carcass.
Don’t rely on your intuition to time this out. Use a watch or a smartphone.
Your adrenaline will be pumping, and you’ll want to rush right in, but don’t. Even after waiting, toss a rock at the carcass or poke it with a stick before you take out your knife.
The last thing you want is to be that one guy who tried to field dress a live deer and things went south… quick.
Do you Have to Gut a Deer Right Away?
How long can you wait before field-dressing a deer?
The moment the deer’s heart stops beating, its immune system stops functioning. Bacteria are going to multiply quickly from this moment on. It is best to field dress a deer as soon as possible.
The USDA’s general recommendations are to refrigerate meat after no longer than two hours, but that’s for butchered meat. A deer carcass is wrapped in hide and won’t start decaying quite as quickly. Even so, you don’t want to wait more than a few hours.
If you wait all weekend, you’ll end up with a horrible stench and spoiled meat. Conversely, a fresh harvest shouldn’t smell foul during field dressing. It should smell fresh.
Keep in mind that just because a deer has been field-dressed doesn’t mean the meat is safe.
Field dressing a deer in warm weather higher than 40 degrees will require the deer to be chilled after being dressed.
Please note that this does not mean the meat needs to be frozen right away. In fact, most people prefer to age their meat in a cooler for days or even weeks before butchering and freezing. This leads to a richer flavor, as well as allowing rigor mortis to wear off for more tender meat.
Field Dress a Deer in 10 Minutes
Tools Required
Before you get started, there are a few tools you’re going to need to get started. Thankfully, it’s nothing you can’t pick up at your local outdoor store, or even a home improvement store.
- A sharp knife. Technically speaking, this is the only tool that’s required. Everything else is just to make the job easier. An enormous blade isn’t always better, since a small or mid-sized blade can be easier to manipulate. The main thing is that it’s sharp. It also helps if there’s some kind of edge on the back, so you can cut from different angles.
- Long latex gloves. You’re going to be reaching around inside a carcass. You can certainly do this with your bare arms, but you’ll be covered in blood when you’re done. A big pair of gloves makes this a lot easier.
- A gut hook. While not required, a gut hook will make parts of the dressing process easier.
- A rope. A rope can be used both for securing the carcass during dressing and for hanging it afterward.
- A tarp. Unless your truck has an enclosed bed, you’ll need something to cover the carcass during transport. A tarp also makes it easier to pack the carcass out after dressing it. Just bundle it up and drag it out of the woods!
Finally, before you begin, make sure to remove any watches, rings, bracelets, or other jewelry. The last thing you want is for something to get snagged inside the carcass.
Step 1: Prepare for Field Dressing
Once you’re sure that the deer is dead, the first step is to get it into position. Find a slope and place the deer with its head uphill and its belly in the air. You’ll need to get between the hind legs.
It is best to have a friend hold the legs in place for you. If you’re alone, it helps to have some rope at this point to tie them down. You can also get creative and wedge the carcass between rocks or logs. The point is that you want it to stay still while you’re dressing it.
Also, if you’re on public lands, make sure to drag the carcass off the trail. It’s rude — and, in some states, illegal — to leave a gut pile laying in a public trail.
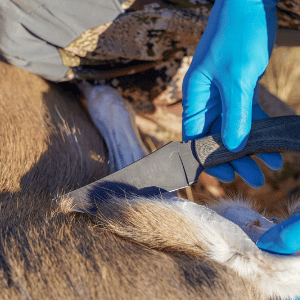
Step 2: Circle Cut Around the Deer’s Colon
Now, get down behind the dear and cut a circle around the anus. You’ll have to cut through hide, muscle, and internal membranes, which may require you to go around a few times.
Be careful not to puncture the colon. If you do, you’ll foul the meat in that area, reducing the amount that ends up in your freezer. Once you’ve cut around the last few inches of colon, you’re done here.
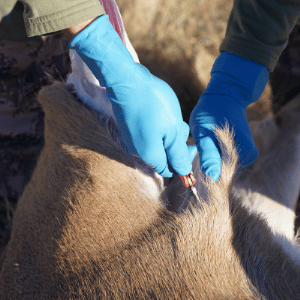
Step 3: Cut From the Anus to the Ribcage
The next step is to cut upwards from the anus to the ribcage. If the deer is a male, you’ll need to cut off the genitals at this point.
From here to the breastbone, you only need to cut about an inch thick. The hide in the belly is relatively thin, and you’ll mostly be cutting muscle and membrane.
A good hunting knife with a gut hook can be very helpful here since it’s pointed the right way already. If you’re using a straight blade, keep your cuts short and shallow so you don’t accidentally puncture any of the organs.
Step 4: Make a Mounting vs Meat Field Dressing Decision
At this point, you reach a crossroads of selecting a mount vs meat field dressing decision.
Mounting the Entire Deer
If you are field-dressing a deer but plan to get the entire deer mounted, don’t cut through the sternum. You’ll want the ribcage intact for proper mounting.
This makes the rest of the process more challenging, so beginners should not try to have their first deer. If possible, it is best to have an experienced hunter help with this part of the field dressing.
Mounting Just The Head
If you field dress a deer and only want to mount the head, you can keep cutting through the sternum up to the neck. Do not cut into the neck and be careful not to cut any deeper than required to cut through the sternum.
Only Keeping the Meat
To field dress a deer to just keep the venison meat, keep on cutting right through the sternum.
The sternum is cartilaginous and surprisingly soft, but you need to be careful not to jerk the blade. Steady leverage takes a bit longer, but it ensures that you don’t accidentally cut too deep. Once you reach the end of the sternum, stop. Don’t keep cutting into the neck.
Step 5: Cut the Diaphragm
At this point, you should be able to see most of the internal organs. Between the chest organs and the abdominal organs, you’ll see a thin membrane. This is the diaphragm.
Reach inside and cut it away from the sides of the body, all the way around to the spine. It needs to be completely cut free for the organs to be removed.
Step 6: Cut the Windpipe
Now, find the windpipe. It should be easy to find, just above the lungs, and should run alongside the esophagus. Reach as far up into the neck as you can, and pull them taut. Cut them off with your knife, as high as you can. This will free up all the internal organs.
Step 7: Remove the Organs
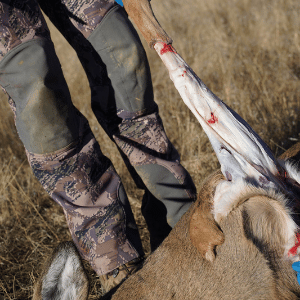
At this point, remove the heart and liver if you want to keep them. Otherwise, just remove them with the rest of the organs. Yank the windpipe as hard as you can, and everything should come out. If there are any membranes still attaching the entrails, slice them — carefully — as needed. Eventually, the colon and anus will pull out as well.
You should now be left with only bone and muscle remaining and field dressing a deer is complete.
Continuing to Hunt After Field Dressing a Deer
f you’re going to stay in the field for awhile, turn the carcass over to help it drain. Leave it on top of a tarp when you do this, so debris doesn’t contaminate the meat.
Hanging & Rinsing a Deer at Home
When you get home, hang the deer from either its deer or its neck to allow further draining. You should also hose out the inside of the carcass.
How long it should hang will depend on air temperature.
If the deer is below 40 degrees, you’ll want to let the carcass hang overnight. If the deer is above 40 degrees, you’ll want to chill the deer within a few hours.
Under these conditions, some hunters will pack the inside of the carcass with ice to start cooling it while it hangs.